Azure Cloud Services


관련 자료

https://docs.microsoft.com/ko-kr/azure/cloud-services/cloud-services-choose-me


Azure Cloud Services란

Azure Cloud Services에 대해 알아봅니다.

docs.microsoft.com

https://cuteprogramming.wordpress.com/2018/01/07/tcp-listener-on-microsoft-azure-for-iot-devices/


TCP Listener on Microsoft Azure for IoT Devices

After working on the beacon projects back half a year ago, I was given a new task which is building a dashboard for displaying data collected from IoT devices. The IoT devices basically are GPS tra…

cuteprogramming.wordpress.com


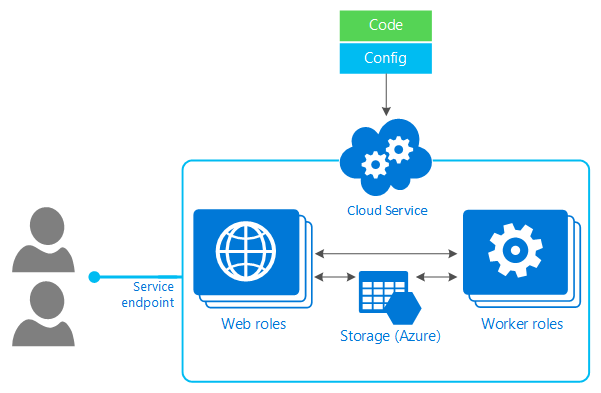
 Azure에서 VM말고 Managed된 환경에서 TCP/IP를 서비스할 수 있는 방법을 찾아 보게 되었다. 가용성과 분산 환경을 고려하면, VM 환경은 너무 무겁고 관리가 힘들기도 하여 Managed 서비스를 찾아보게 되었다. 그 중에 찾아 보다보니 Azure Cloude Services라는 서비스가 있는것을 알게 되었다. ( 이전 Worker Role 이라고 보면 된다 )

이제 이 서비스로 MAVLink 프로토콜을 통해 드론을 통제및 모니터링 하는 프로젝트를 만들어야 한다.


Dynamic Role-Based Authorization in ASP.NET Core 2.0


관련 자료


Dynamic Role-Based Authorization in ASP.NET Core 2.0

You already know how role-based authorization works in ASP.NET Core but what if you don't want hardcode roles in authorization attribute or create roles later and specify in which controller and action it has access without touching source code?

www.codeproject.com


mo-esmp/DynamicRoleBasedAuthorizationNETCore

Dynamic Role-Based Authorization in ASP.NET Core 2.0 - mo-esmp/DynamicRoleBasedAuthorizationNETCore

github.com


You already know how role-based authorization works in ASP.NET Core but what if you don't want hardcode roles in authorization attribute or create roles later and specify in which controller and action it has access without touching source code?

Introduction

You already know how role-based authorization works in ASP.NET Core.

Hide   Copy Code

[Authorize(Roles = "Administrator")] public class SomeController : Controller { }

But what if you don't want hardcode roles in authorization attribute or create roles later and specify in which controller and action it has access without touching source code?

Using the Code

Let's begin our journey. Create ASP.NET Core Web Application project and change authentication to Individual User Accounts.


제목


관련 자료


Microsoft Ignite | The Tour


techcommunity.microsoft.com


What is the Helm

쿠버네티스 패키지 매니저 플러그인 helm 소개 자료입니다. 쿠버네티스 한글 유저 그룹 밋업에서 발표한 키노트 자료 공유합니다.

www.slideshare.net


AWS re:Invent 특집 세미나 - (1) 컴퓨팅 분야 신규 서비스 요약 :: 윤석찬 (AWS 테크에반젤리스트)

클라우드의 미래를 가늠할 re:Invent를 통해 출시한 다양한 서비스를 소개합니다. 본 세션에서는 폭넓고 깊이 있는 클라우드 (컴퓨팅) 서비스를 제공하기 위한 가상 서버, 콘테이너 및 서버리스 분야의 신규 서비스를 알아봅니다. 베어 메탈을 비롯한 가상화 분야의 혁신 과정과 쿠버네티스…

www.slideshare.net


Introduce Google Kubernetes

Google의 Kubernetes에 대해서 간단하게 정리 해봤습니다.

www.slideshare.net


 4월 3, 4일 이틀에 걸쳐서 코엑스에서 Ignite Tour 세미나를 개최에 참석을 하였다. 이전과는 다르게 Kubernetes (docker orchestration )를 통한 Docker에 대해서 많은 시간을 할애 할것으로 보여진다.


Kubernetes logo


 클라우드 환경이던지, 사내 환경이던지 모두 Docker에서 돌아 갈 수 있도록 개발하고 DevOps를 지원할 수 있도록 개발 플랫폼 환경을 구축해야 겠다는 생각을 하게 되었다.


  • A component model for building composable UI
  • Routing
  • Layouts
  • Forms and validation
  • Dependency injection
  • JavaScript interop
  • Live reloading in the browser during development
  • Server-side rendering
  • Full .NET debugging both in browsers and in the IDE
  • Rich IntelliSense and tooling
  • Ability to run on older (non-WebAssembly) browsers via asm.js
  • Publishing and app size trimming


C# 난독화 - obfuscar


참조 URL
  1. https://www.obfuscar.com/
  2. https://github.com/lextm/obfuscar
  3. https://github.com/lextm/obfuscar_example
  4. http://docs.obfuscar.com/en/latest/
  5. https://yck1509.github.io/ConfuserEx/
  6. https://github.com/yck1509/ConfuserEx


LiteDB - .Net, IOS, Android, Windows Phone


참조 URL
  1. http://www.litedb.org/
  2. https://github.com/mbdavid/litedb
  3. https://github.com/Ar3sDevelopment/UnitOfWork.NET.LiteDB


 SQLite와 비슷하게 크로스 플랫폼을 지원하고 있지만 MongoDB에서 영감을 받아 만들어진 LiteDB다. MongoDB와 같이 json 또는 bson 형식으로 데이터를 관리한다.


아래 '코드1'은 "http://www.litedb.org/"에서 나와 있는 코드로 POCO 형식을 입출력하는 예제이며, '코드2'는 POCO 클래스와 실제 물리적인 테이블간의 매칭을 시켜주는 방법을 보여주고 있다.


[코드1] CRUD


[코드2] Mapping


LiteDB V2 ( 2.0.0 )은 아래와 같은 제한 사항과 기능을 가지고 있다.


제한 사항(Limits) : 


  • Collection Name:
    • Pattern: A-Z_-0-9
    • Maxlength of 30 chars
    • Case insensitive
  • Index Name:
    • Pattern: A-Z_-0-9 (. for nested document)
    • Maxlength of 30 chars
    • Case sensitive
  • BsonDocument Key Name:
    • A-Z_-0-9
    • Case sensitive
  • FileStorage FileId:
    • Pattern: same used in file system path/file.
    • Case sensitive
  • Collections: 3000 bytes to all collections names
  • Documents per collections: UInt.MaxValue
  • FileStorage Max File Length: 2Gb per file
  • Index key size: 512 bytes after BSON serialization
  • BSON document size: 1.044.224 bytes (~1Mb = 256 pages)
  • Nested Depth for BSON Documents: 20
  • Page Size: 4096 bytes
  • DataPage Reserved Bytes: 2039 bytes (like PCT FREE)
  • IndexPage Reserved Bytes: 100 bytes (like PCT FREE)
  • Database Max Length: In theory, UInt.MaxValue * PageSize (4096) = ~ Too big!


New features in v2 - https://github.com/mbdavid/LiteDB/releases

  • Portable version: LiteDB.Core (Supports UWP 8.1/10, Xaramin.iOS and Xaramin.Android)
  • Generic data access layer - can use any Stream or you can write your own disk access layer
  • Database encription option (using password= in connection string)
  • New memory cache manager (do not consume too memory in large inserts/updates)
  • Better mapping class from your entity to BsonDocument (like Configurations in EntityFramework)
  • Better cross reference with DbRef mapping (see unit tests examples)
  • Lazy engine load (open datafile only when run a command)
  • Reduce your database size with shrink()
  • Support for Initial Size and Limit Size database (connection string)
  • Complete re-write engine classes width full debug logger
  • Complete stats about data/index usage
  • Dump file to Import/Export your data using shell commands
  • Full documentation for v2 on Wiki
  • See more examples in http://www.litedb.org/


Angular CLI ( Common line interface )


참조 URL
  1. https://cli.angular.io/
  2. https://cli.angular.io/reference.pdf
  3. https://www.angular.io/


 Angular2를 개발할 수 있도록 Angular-CLI를 제공하고 있다. 아래와 같이 NPM을 통해서 설치하여 개발 환경을 쉽게 구축할 수 있다.


[그림1] 설치 및 개발 환경 세팅


[그림2] ng new를 통해서 환경 세팅


위 '그림2'와 같이 개발 환경을 세팅을 하고 있으며 마지막으로 "ng serve"를 통해 아래와 같은 화면을 확인 할 수 있다.


ASP.NET 5 MVC6에서 Glimpse 사용하기


참조 URL
  1. http://blog.getglimpse.com/2015/11/19/installing-glimpse-v2-beta1/


우선 MVC6 프로젝트를 두가지로 나눠서 테스트를 해보도록 하겠다. .Net Core와 .Fremework로 각각의 프로젝트로 만들고 아래와 같이 NuGet에서 Glimpse를 includ prerelease를 체크하고 검색하면 아래와 같이 "v2.0.0-beta1" 버전이 검색이 되며 각각의 프로젝트에 추가를 한다.


[그림1] NuGet에서 검색된 결과 화면


[그림2] Glimpse를 추가한 프로젝트


Glimpse는 현재 버전에서는 에러가 나고 있는 걸로 봐서 "Core" 버전을 지원하지 않고 있는 것으로 파악이 되며 .Net Framework로 만들어진 MVC6 프로젝트는 정상적으로 표시가 되고 있다. 차후에는 "Core"버전도 지원이 되었으면 하는 바램이다.


[그림3] .Net Framework의 project.json 파일에 "Glimpse" 추가


 .Net Core에서는 지원하지 않는 것으로 확인이 되었으니 이제 MVC6 .Net Framework를 확인해 보도록 한다.


[그림4] .Net Framework 에서 app.UseGlimpse() 에러


위와 같이 Glimpse를 추가한 상태에서 "services.AddGlimpse();" 까지 적용하고 "Configue" 메소드에서 "app.UseGlimpse()"를 입력하면 에러가 발생이 되고 있다. 가이드 대로 똑같이 진행 하였으나 에러가 발생이 되는 이유를 분석하여 보니 Glimpse beta1은 2015년 11월달에 나왔고, MVC6는 현재 2016년 7월에 update3를 통해 계속 패치가 되던중에 namespace가 변경이 된것으로 추정이 된다. 그래서 네임스페이스가 상이하여 "UseGlimpse()"를 사용할 수 없게 된것이다. 이건 다음 beta가 나오면 해결 될 것으로 보여지는 현재 버전에서는 사용할 수 없다. 


 지금까지 MVC6에서 Glimpse beta1에 대해서 알아 보았으나 현재 버전에서는 사용할 수 없는 것으로 확인이 되었다. 어서 빨리 다음 버전이 나와서 사용할 수 있었으면 하는 바램이다.


EntityFramework Core performance


참조 URL
  1. https://youtu.be/x3cymeg9Lpo?t=1255


 Entity Framework Core는 기존 하위 버전보다 약 80% 정도의 속도 향상이 된듯하다.


시간이 없어서 검증은 차후에 해봐야 겠다.


Ionic2 + angular2 + Visual studio code - quickstart


참조 URL
  1. http://ionicframework.com/docs/v2/getting-started/
  2. http://www.gajotres.net/ionic-2-how-to-use-cordova-plugins/
  3. http://www.joshmorony.com/using-cordova-plugins-in-ionic-2-with-ionic-native/
  4. https://forum.ionicframework.com/t/ionic-2-with-ng-cordova/36103


아래와 같은 순서로 진행한다.

( node, npm 이 동작할 수 있도록 구성은 되어 있어야 한다.)


> npm install ionic@beta -g

> npm install cordova -g

> ionic start example tutorial --v2

> cd example

> ionic serve or ionic serve -l -a


--------------------------------------------------------------------------------------------------------------------------------


> npm install ionic@beta -g


전역으로 ionic@beta 모듈을 설치 한다.


> npm install cordova -g


전역으로 cordova를 설치 한다.


> ionic start example tutorial --v2


전역으로 받은 모듈을 통해 ionic 프로젝트를 만든다. 

example 폴더를 만들고  ionic2 버전으로 tutorial 템플릿을 가지고 만든다.


> cd example


example 폴더로 이동


> ionic serve or ionic serve -l -a


ionic 프로젝트 로컬에서 확인할 수 있도록 자체 웹 서버를 구동하여 미리보기 할 수 있도록 한다.

이렇게 실행하면 브라우저가 뜨면서 화면을 확인 할 수 있다.


[그림1] ionic serve 실행 화면


[그림2] 미리보기 화면


위와 같이 마무리가 되었다면 Visual studio code에서 폴더로 불러오면 아래와 같이 된다.


[그림3] Visual studio code에서 불러오기


 이제 부터 app > pages > hello-ionic > hello-ionic.html 파일을 열고 코드를 수정하면 바로 "그림2"에서 본 화면에서 새로 고침이 되어 즉각 확인 할 수 있다. 이제부터 Ionic2 + Angular2로 개발할 준비가 완료가 되었다.


+ Recent posts